

NOMADOMO
Floor made of linked boxes
The floor basically consists of interconnected boxes. Each box has plates all around it. Vertically, in the corners at the sides, are (probably) wooden beams. When linked, these beams are connected with bolts. Then the plates are clamped in between. This gives a strong and stiff whole. The beams can remain relatively small because the four of them together form a thicker beam.
Where the bins are connected, a thin strip for acoustic disconnection can be placed between the plates. But do think about what that means for thermal insulation. It may leave some room for insects, but not for mice.
Horizontal beams at the top and bottom of the boxes together with the side boards, form strong I-beams. The top horizontal beams also protect the edges of the boards.
Instead of horizontal beams inside the floor boxes, you can also make linking beams in between the boxes. This can be in width or length direction, or both. The bins must then be slightly smaller and the space between the bins can or must be filled with thermal insulation. If the beams are in both the latitude and longitude directions, then they cross each other at slightly different heights. The beams form a kind of trench on the sides under the running floor, into which flocks can end up, so that the boxes remain cleaner. Build mouse-tight and take moisture into account.
You can also place linking beams on the top and bottom of the edges of the floor boxes. Bottom-mounted beams can be an easy start to a storey floor. In the case of a storey floor, there will only be pressure forces at the top, so there is hardly any need to link these at the top.
Structure of floor boxes
B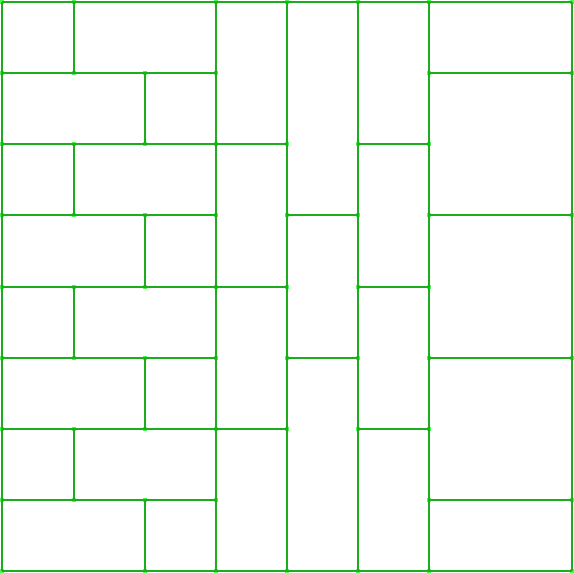 y giving the bins different sizes and by allowing everything to jump, the whole can become stronger in the longitudinal "or" latitudinal direction without connecting beams.
Functions of floor boxes
A floor-box can easily be used as storage space. But it can also contain a (part of a) seat pit or a bed hidden in the floor.
Floor elements may be integrated into wall elements. Then you mount the rest of the floor to this floor - and the wall won't stand on a floor.
Floating floor
When the bins are watertight, the building floats. Couplings under water may not be necessary because the water pressure at the bottom mainly causes pushing forces. If the floor can be both in and out of the water, it becomes more difficult.
Floorbox-lids as walking floor
On top of the floor boxes will probably be a wooden floor. If you construct this like a lid, you get storage space inside the floor. A bed or seat pit in the floor can also be covered with lids.
A good connection of the lids is desirable to make it difficult for mice to live with you.
For larger constructions under the floor, such as a bed, extra support beams under the lids will be required.
If you execute the walking floor in a sound-absorbing way, the bins can be screwed together more tightly.
Floor and ceiling
Making a floor out of boxes is easy at ground-level. Doing this in the air is more difficult, unless there is already something there, such as a beam or a ceiling. A ceiling can serve as extra soundproofing or extra insulation underneath the upper floor and of course for appearance. The ceiling also carries the upper floor during the construction of the house.
In terms of sound, you can disconnect the walking floor from the floor boxes, or make a suspended ceiling, or both.
Insulation under the top floor
If no storage space in the floor is desired, you could install the insulation directly under the walking floor and then ventilate under the floor against moisture. Vapour-permeable foil will be attached to the underside of the insulation and the whole must be airtightly clamped in the floor box. The ground is then covered airtight and in accordance with building regulations.
The boards and the wood under the floor must be sufficiently resistant to cold and/or moisture, depending on how strongly you ventilate. This is often not trivial with fire resistant boards. Inspection is easy.
The building can stand on many small legs that can be adjusted from the inside.
Insulation under the house
You can put the whole house on foam glass, polystyrene foam, diatomaceous earth, blocks of concrete foam, or glass foam. Underneath the polystyrene or diatomite there is preferably a vapour permeable foil. Kieselguhr or diatomaceous earth can be put in vapour permeable bags (at the cheapest, may be to make very small holes in the bags; spilling some is ecologically not a problem). Glass foam on geotextiles and vibrate. The plates under the floor boxes must be able to support and distribute the weight.
You can put this insulation on the ground first and then build your house on it. You can also integrate it into the floorboards. For example, if you mount a glass foam plate on an adjustable plate at the bottom of each floor section, you can put your house anywhere. You could "hang" glass foam granules in a geotextile bag under a floor section.
Both the insulation and the ground can sink in, but you can adjust that from the inside out, for example by placing each bucket on adjustable feet. In the case of pressure-resistant insulation, the levelling feet are placed on the insulation. With soft insulation (not yet mentioned in this context), the adjustable feet go through the insulation and stand on the floor.
In analogy with cold and warm roofs you could call this a cold floor, but that's confusing, because it's actually warm.
Insulation at the bottom of floor boxes
You can make insulation at the bottom of the floor boxes, in the same way as you make insulation under the walking floor, but a bit deeper and with an extra floor on top for storage space, for example.
If you want to make the underside of the building watertight, for example to make it float, you will have to make the insulation completely airtight, or you will have to think of something for ventilation.
For example, if you use vacuum insulated panels, a small amount of moisture that may arise in the not completely airtight enclosed space behind such a panel may not be a health disaster, but it is probably not good for the base plate of the floor-box.
Horizontally between the trays at the bottom you also have to seal because of heat loss, or else the trays also have to be insulated at the side.
Ventilation under the insulation
Leave a small space under the insulation, with good masking or something like that on the top. Make two tubes or tubes upwards from under the insulation. A connection for a vacuum cleaner on this, with an automatic valve may be sufficient for ventilation. The vacuum cleaner connection does not have to be more than a hole in the floor. It can open automatically when you vacuum. Of course, this will also cause moisture to enter the floor; the vacuum cleaner will have to from this. The air underneath the insulation should preferably come from outside and not be humid inside air.
Instead of tubing, you can also make holes in the corners of the bins. After assembly of the floor boxes, you will get air ducts between the boxes, in the corners, upwards or downwards, or between the boxes, depending on where you seal it.
A moisture sensor - two metal strips - in some or all of the trays is desirable because of its experimental character. Connected to a grid, they are easy to read out.