

NOMADOMO
Walls
Drawings on the left are side-view cross-sections.
Drawings on the right are top-view cross-sections.
Timber frame construction: an indivisible skeleton
In timber frame construction, you usually make a load-bearing inner wall by means of a wooden frame on which (wooden or fire-resistant) plates are placed on both sides, which make the whole thing fire-resistant on both sides of the wall for half to one-and-a-half hours. This means that the fire protection is actually done twice; once for the inside and once for the outside, to resist fire on both sides.
All beams of the timber frame are connected to each other between the fire-resistant boards. In this way it is difficult to make a demountable house because you cannot reach the skeleton.
You can also apply the linking beams on the outer sides of the wall, with the connections being so good that one of them may burn away - this can be done with horizontal beams, for example.
Inverted wall
With what I call an "inverted" wall, you put the fire resistant plates in the middle and the skeleton in duplicate on the outside. The load-bearing part is thus double with a skeleton on the inside and a skeleton on the outside of the fire-resistant plates. In the event of fire, one of the skeletons may burn away. Wall sections designed in this way can easily be linked to each other.
The fire protection can only be carried out in this way when the panels are anchored to both frames. This can be done by making the skeleton beams slightly staggered in relation to each other (see drawing on next page). You can also take two plates, one attaching to the inner frame and the other to the outer frame. Then you make them together with staples.
If the plates have a constructive function, then of course the possible burning away of a single plate must still be taken into account.
Linking walls: fire resistant side boards
By mounting a fire resistant plate on the sides and the top and bottom of the wall elements, they can be pressed airtight against each other by means of a flexible fire-resistant foam tape.
The fire resistant panels may need to be able to withstand pressure forces that will be applied to them. Slight overload and damage in case of fire need not be a problem. One could also not completely cover the skeleton on the side and somehow make that the pressure forces do not go through the side boards.
Hybrid wall with middle skeleton
Between two fire resistant boards, extra insulation can also be provided for soundproofing or extra fireproofing. This can be finished all around with wood, which then forms the hidden middle skeleton. If there is an inner and outer frame, the middle frame only needs to be partially load-bearing.
The fire resistant plates that are all around on the sides of the wall section are placed on this central frame and possibly on the beams of the inner frame (see drawings).
All in all, this is a bit of an ordinary wall and a bit of an inverted wall, thus a hybrid wall. With policy you can make one or more of the three skeletons thicker and thinner or omit them. With only a central skeleton you get a traditional wall.
Note that when the wall elements are connected the fire resistant boards are clamped all around - that is to the sides, bottom and top - between beams, so that their strength can be used to the maximum. Clamping leads to less force on screws and bolts and may make it possible to use new types of material for construction.
There must be sufficient strength without clamping force in the event of fire, but in the event of natural disasters the extra clamping force may be necessary.
Beamless construction: Blokiwood®
Blokiwood® (www.blokiwood.fr or www.blokiwood.be) has a great system with only OSB boards and wood wool insulation. The plates have different thicknesses. In the side plates a groove is feared in which the inner and outer plates are glued. This results in a very strong, load-bearing whole.
Linking an inverted wall to a floor
With an inverted wall, the floors must be attached to both the inside and outside skeleton. The floor must thus pass through the fire protection of the wall.
In the case of floors, we simply keep the fire resistance to the "outside" of the floor frame, i.e. with fire-resistant boards such as floor and ceiling.
The floors as a whole protrude through the load-bearing walls. They lie on and under the fire-resistant finished sides of the walls.
The sides of the floors are also fire-resistant.
The lower, ground floor can possibly be fixed to the inner wall only, since the fire cannot come from below.
With normal, not inverted, and with many hybrid walls, the floor is attached to the middle skeleton.
Curtain wall
Outside the load-bearing wall there can be a curtain wall and extra insulation. Together they protect the external fire resistant plate. Not all fire resistant boards can withstand frost.
Additional fire resistance can be incorporated into the curtain wall. The curtain wall and the inner wall can then form a traditional - and therefore extensively tested - facade with fire protection on the outside of the outer frame.
Fire resistance can even be achieved with a ventilated cavity by means of fire resistant foil (fire screen) or (vapour permeable) fire resistant plates.
If the curtain wall is retrofitted or can be dismantled, then the wall sections can be connected fireproof. This goes a little against the demountability of the building, but it is possible.
The triple layered basic wall
If the additional thermal insulation between the inner and outer skeleton is also applied, the middle skeleton is protected from two sides by thermal insulation. It could be made fire resistant for hours. Then the insulation must stay on and not burn.
This unnecessarily complex facade is our basis because its parts can be omitted or made thicker or thinner.
Incidentally, walls are often made triple. The middle skeleton is then the traditional skeleton with a curtain wall outside. The inner skeleton is the technical cavity.
Inner wall and cable trays
T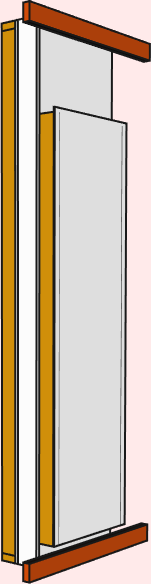 he middle skeleton has an inner plate; the inner skeleton can have an inner wall as a finishing touch. The inner wall must be removable or partially open to be able to mount the wall elements. The inner wall can be made of cloth, whether or not painted. In a single-stone mansion build in 1907 where I once lived, there were slats on the inside of the wall on which linen was stretched, with a dozen layers of latex on it, and behind it was hay. A room-mate used to burn candles on a 5-centimetre wide windowsill. The wall was black with the burning candles, but it never caught fire in all those years.
In my favourite design there is a cable duct at the bottom, behind the plinth and connecting beam that can fit a power outlet. Above the plinth there is an opening so you can reach it. This opening can also be used to fix the wall at the bottom and to the side. The inner wall is a cloth or thin plate with cotton or wool insulation behind it and extends to a height of about 2 meters 25. There there is a second cable duct, light box and rails to hang paintings and the like on. Above this, the inner plate of the inner skeleton is the inner wall. Because there is room to fix the wall elements at the side and top, the inner wall does not have to be removable.
Functional wall elements: The thick wall
The easiest for a moveable wall is to leave it standing on its own and stack it. To do this, the wall must become thick, for example by making a cupboard in it, or a table, or a sink, or a bed, or technology, or ... you name it.
On the drawing to the right a fire resistant plates with each two bars form very strong I-beams. These beams and plates are located at the top, bottom and sides, thus forming a strong whole.
With similar components, after mounting, each beam on the other side of each plate is coupled with another beam, with another fire-resistant plate between them, so that the whole is also strong and rigid with small beams, for example 44 × 44 mm.
Every "box" becomes a fire-resistant compartment, which means that fires caused by electrical devices contained therein are limited from the outset.
Bare wall elements
"Bare" wall elements have no other function than to be part of a wall. You can make these with a removable inner wall or by omitting the inner skeleton completely. The easiest way is to make the latter quite narrow and floor-high. Then you have no horizontal seams.
Note that we call the (from the building's point of view) inner skeleton a middle skeleton. We cannot reach it other than by unscrewing the fire resistant plates. The inner plate is also the inner wall.
Open skeleton: Wall elements being boxes
To make it even crazier... We can also make a skeleton so that it can be opened, for example on the outside. It then looks like an outer skeleton, but in the building as a whole it is more in the place of the middle skeleton, or the middle and inner skeleton together. You can then attach a wall element from the outside to other wall elements and the floor. Such an open skeleton will look like a box with a lid from the outside. The insulation may be removable, for example because it is in a bag.
The shape of a box with a hole at the top is also possible. In that case, a cover is not necessary if the upper element of the wall closes the hole. You don't have much mounting space, but you can make special tools for that. This box can easily be filled with loose insulation materials. This open box can have an outer frame, for example for the assembly of the curtain wall.
Cabinet wall elements
You could make high, narrow, shallow cupboards of all the wall elements - provided they have no other function - with tight cupboard doors that resemble a wall. You can then not use part of the cupboards if there is something leaning against it. In these cabinets you can also build in things like a screen, with or without doors in front of it.
Green exterior walls with a slope
We would like to integrate planters in the facade. This is easier to do by giving the facade an angle of 60 degrees on the outside, for example in a stairwell with this angle. The wall will then become thicker at the bottom than at the top. A wall 2 meters 70 meters high becomes 1 meter 35 wider at the bottom. Functionally, a height of about 2 metres is more important. Calculated from a height of 2 metres, the wall at the bottom is 1 metre thicker. At table height, the wall is 35 centimetres thicker and at counter height 45 centimetres. So if you make a worktop against an inner wall, 65 centimetres deep, or a worktop for stand work, 55 centimetres deep, then you won't bump your head. If you give cabinets up to 1 meter 80 high a straight wall then they are 90 centimetres deep at the bottom if they have no depth at the top. You can also give this space to the plants outside.
Windows or window walls may better be made vertical due to sun and rain. You could then, together with the glass, make the entire wall vertical from a height of 90 centimetres or make it look more like a dormer window. For example, a piece of vertical outer wall, possibly with an integrated greenhouse, can be good for growing green beans or tomatoes.
Fences and walls
The disadvantage of a sloping wall is that it can be climbed by people with less good intentions, but that is inherent in the choice for a real green and edible house. If you can't reach the greenery of your house easily, then only weeds and succulents will grow on it and it's hard to harvest anything. If this is important then you have to do something with fencing and walling.